
To capture movement in photography is all about shutter speed (how long your shutter is opened, exposing the sensor to light) paired with the speed at which your subject is moving or the speed at which the camera is panning for example for intentional camera movement techniques (example further down).
But what kind of movement might one want to capture and how do you photograph movement?
You may want to capture someone walking, or maybe a bird in flight, or a dancer, a wave, clouds, fast cars, tall grasses dancing in the wind… very much anything which has motion and surrounds us in our daily lives.
Slightly more advanced: It is also possible to create the motion by simply panning the camera, or zooming while the shutter is actioned. It creates a particular type of effect and you are in fact capturing your own movement of the lens, this is called intentional camera movement.
While we often look for sharp photos which represent only a fraction of a second held still, here we want to stretch the length of time captured. By slowing down the shutter (increasing the exposure), instead of 1/250th of a second, we may decide to capture 4 seconds in one single image.
The slower the motion you are attempting to capture the slower the shutter speed. While a fast moving car may only require a 1/125th of a second for its motion to show, it may take five seconds to capture the movement of a snail.
The best way we’re going to get through this is by using examples of mine to illustrate various ways to capture motion in photography.
How to Photograph Light Trails:
Light trails photography is something most photographers will attempt at least once in their lifetime. It is a form of light painting photography.
To photograph light trails the photographer will first frame their shot, for example by the roadside, camera on a tripod (or resting on a surface) they will set a slow shutter speed of perhaps a couple of second or a little more.
With enough practice shortening or increasing the shutter speed, they should achieve the result they are after.
Little tip: Since you are using a slow shutter you want to avoid camera shake so my tip is to use the 2s self-timer to avoid the shake resulting from pressing the shutter button.
Also beware of bridges, they tend to shake with traffic = blurry photos. Also shield your camera from the wind, another cause for blurry shots.
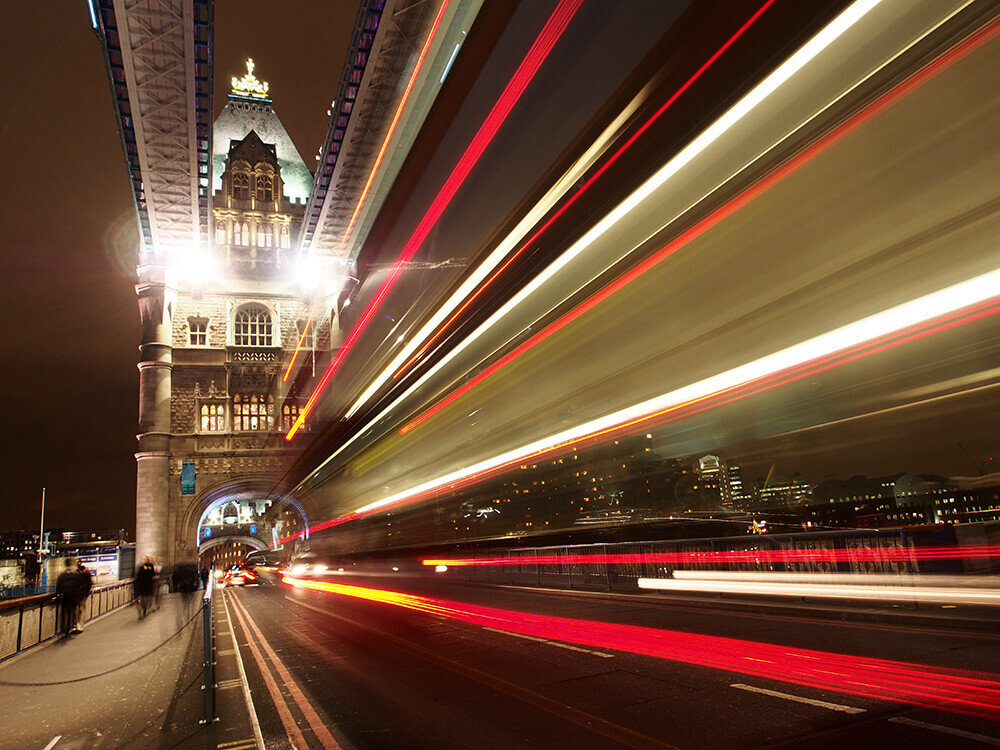
Exposure Time: 2.5 sec on tripod
How To Capture People in Motion:
I know you wouldn’t but for the sake of explanation… grab your camera in auto mode and shoot a broad daylight scene in the street. People will be sharp, the motion will be “frozen” in time. This is because the camera is programmed to assume this is what you want, sharp photos.
Ideal for street photography, in order to capture people in motion, moving, walking, you could use a tripod but it is also possible handheld provided you can adopt a firm posture and reman very still.
When handheld, the aim is to lower the shutter speed enough to capture movement yet not so slow that it becomes hard to retain the sharpness of the background, for example a wall.
Here are a couple of examples I shot and I include exposure settings so you can use this as reference:
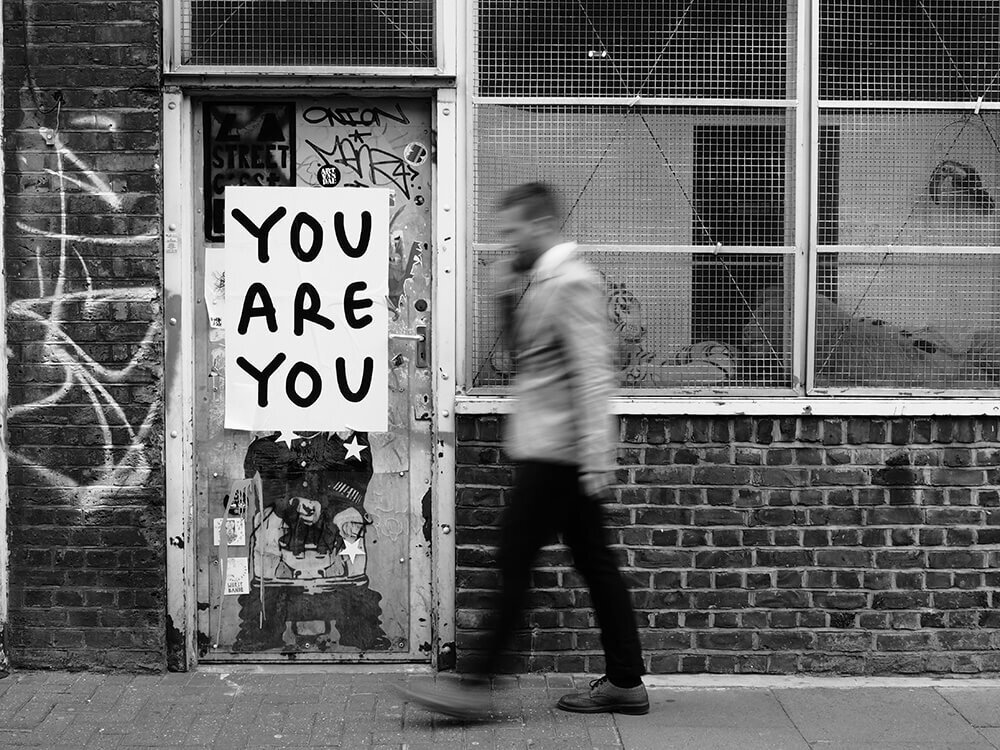
Exposure Time: 1/20 sec, handheld

Exposure Time: 1/4 sec, on tripod
How to Capture Moving Clouds:
In order to capture moving clouds, a tripod is required and very possibly a neutral density filter or, like in this image below, an infrared filter which screws at the end of the lens.
What these allow is for less light to hit the sensor (think sunglasses) and therefore requiring much longer exposures resulting in stretched-like clouds.
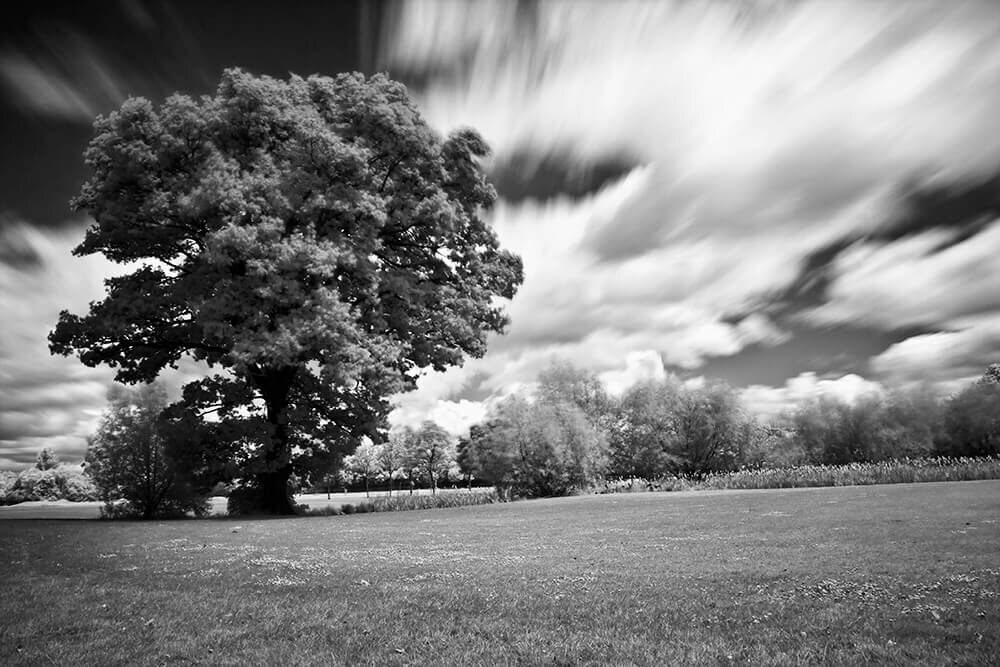
Exposure Time: 31 sec, with infrared filter and on tripod
How to Capture Intentional Camera Movement:
A fun and creative photography technique, capturing intentional camera movement can yield great results and inspire entire projects.
In this case it is not the subject which is in motion but the photographer or the camera rather.
The same principle applies and you can try this on your next photo walk.
Set an exposure at 1/4 of a second for example and aim at a building, or trees perhaps. Now as you press the shutter point your camera from below the building to above it in the time it takes the shot.
It may require a few attempts.
The camera will record this upwards movement and seemingly stretch your subject, such as in this photo of the iconic Battersea Power Station in London:
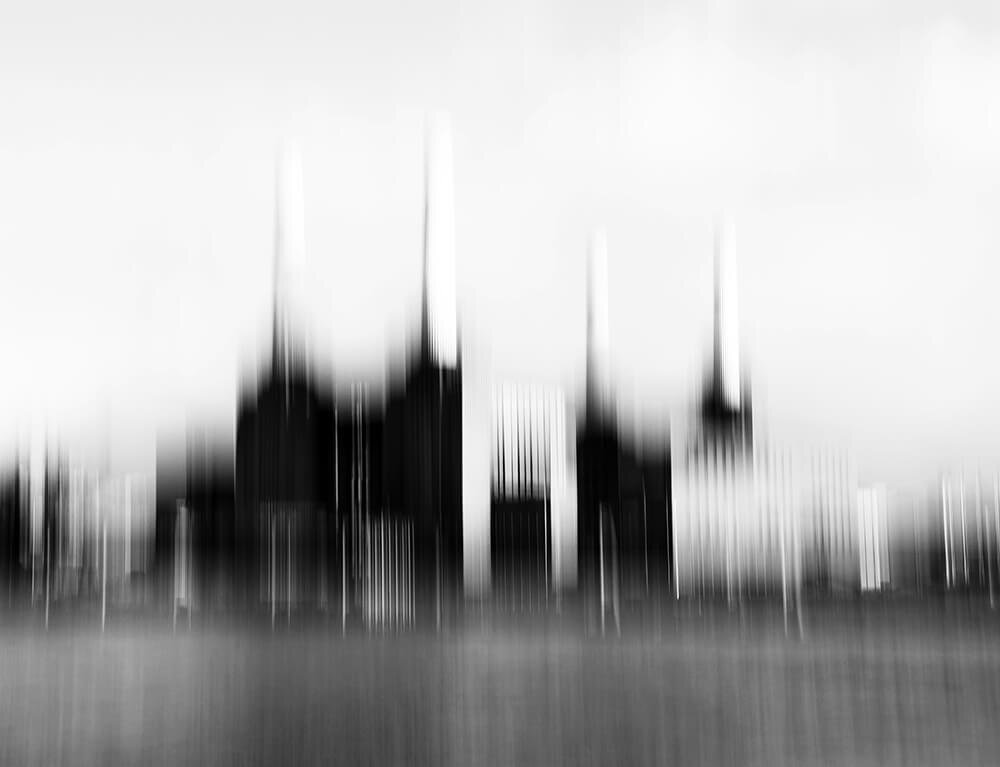
Exposure Time: 1/50 sec, handheld, quickly tilted upwards during shutter actuation
I particularly like the painterly qualities of using this technique. Once again, you are 100% painting with light when you apply such technique.
So that’s how I capture movement in my photography.
I could go on and on to try cover all things one can capture in motion, but you’re clever people and will be able from these few tips and ideas to head out and try it yourself successfully.
After all nothing replaces practice and experimentation!
I will leave you with this 50 second exposure of the London Eye in motion, shot in broad daylight using an infrared filter:

Exposure Time: 50 sec, on tripod, using an infrared filter
I hope this will inspire some of you to head out and capture movement through long exposures.
Until next time,